
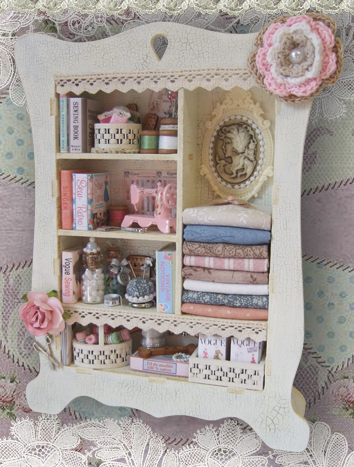
Cabinet of Shabby Chic Sewing Curiosities
The first of two new ideas for our Cabinet of Curiosities, both featuring a Sewing theme. The first includes many of the techniques that are applicable to both Cabinets and was inspired by Shabby Chic.... which I love :-). Loads of info here and some freebie printables, so sit back, with a cup of coffee, or similar :-)..... and enjoy!
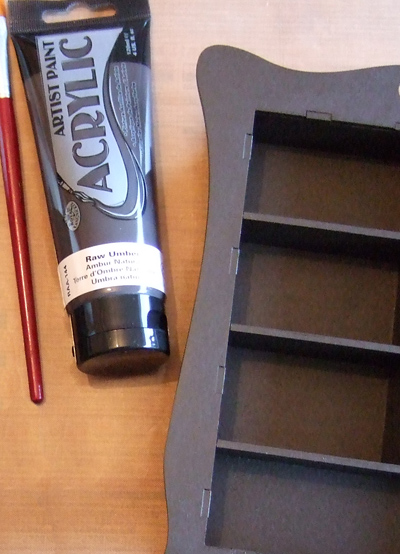
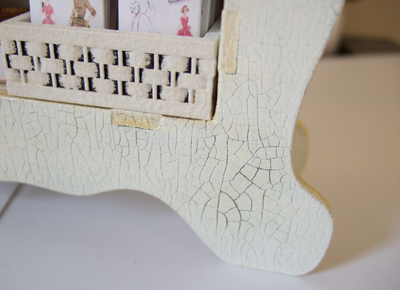
Firstly Assemble the Cabinet of Curiosities then paint the entire Cabinet in two coats of Acrylic Paint in Raw Umber. Unfortunately in my enthusiasm to get going I didn't photograph the next steps, but basically I then painted on two coats of White Gesso before finishing with a coat of Decoart One-Step Crackle. This causes the White Paint to Crack and pulls it leaving the Brown showing underneath. See finished detail below :-)
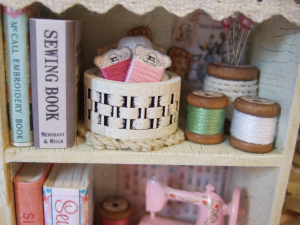
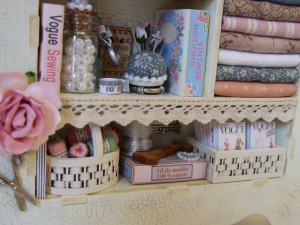
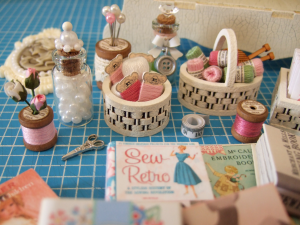
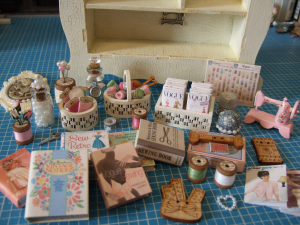
Ok, we'll start at the top and work our way down :-) I have used the Round Basket from our new 3D Miniature Baskets Pack on the Top Shelf. Stick them together with a little PVA between each layer. In the pack you will find the Oval and Oblong Basket have two fancy layers the same and one different, ensure you stick the two that are the same, one to the Bottom of the Basket and one to the Top, the different one goes in the middle thus forming the Basket Weave Effect. Always dry fit together if you are ever unsure first. I sponged all the Baskets with White Gesso after assembly, use very sparingly on the outside if you want some of the detail to still show through. I have filled the basket with 4 Cards (2 at the front, 2 at the back) with 6 Strand Embroidery Thread Wrapped around. The Cards are on Sewing Printables Sheet 2. The Round "Balls of Wool" behind are created by sewing thread around the outside of Pony Beads. I sat the Basket on a Crochet Flower from my stash. The Books are created as per information given on Halloween Cabinet of Curiosities Blog Post. All the Covers for the Books in both Cabinets on Sewing Books Printables Sheet. Behind the Basket I have stuck to the back of the Cabinet our Basket of Fabric Button. The Vintage Sewing Machine image is on the Printable, I stuck this to thick card before attaching. Finally the Cotton Reels were purchased on Amazon UK. They come assorted, in 3 sizes, in a pack of 22, I have used 1 Medium and 2 Small. On the top of each Reel I have stuck Reel Labels from Printable Sheet and wrapped in Lace and 6 Strand Thread respectively. In the Small Reel at the back I also added some Pink and Cream Pearl Pins, trimmed shorter.
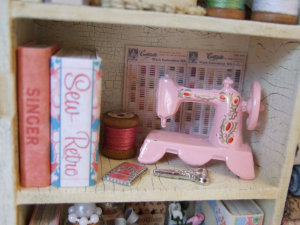
Shelf 2. Book Covers and Printables on Sheets as above. The Fab "Pink" sewing Machine is a Dolls House Miniature purchased on ebay UK. (shop around.... prices vary:-)) The Mini Scissors are a Charm with the "ring" snipped off! All attached, as always, with Crafters Pick the Ultimate Glue.... great for metal items.
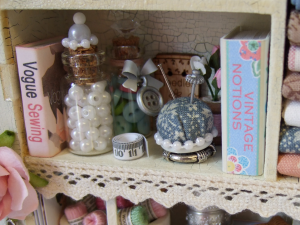
Shelf 3. Books and Printables as before. The Tape Measure (on Printables) I constructed from the same image repeated, but once it's wound up..... who knows ;-) At each end I have stuck a Silver Circle punched out of Silver lightweight Card with my Crop-a-Dile which I folded in half. To create the wound effect wrap it round a thin Paint Brush then remove and pull to desired size. The Bottles are filled with Tiny Pearl Beads and Tiny Buttons in Pastel Shades, topped with Decorative Pins cut short and pushed into the Cork Tops. The White Metal Bow was purchased from the lovely Jayne at Stamposaurus and the Button Charm on-line. This was originally Brass coloured (see other Cabinet for original colour) but I simply coloured it with my Silver Metallic Sharpie Pen.... great for Metal! I attached our Needle-Case Button to the back, stuck some tiny Paper Rosebuds in a Reel and made the Pincushion by covering a tiny Polystyrene Ball in fabric and sticking to a stacked up Ring.
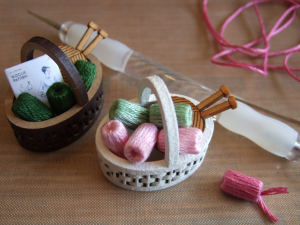
Shelf 4. Ok... still with me ....good :-)....... I have used the remaining 2 Baskets From our Pack here. Next to the oval are some Mini Knitting Patterns all on Knitting Patterns Printables.... take your pick. The Oval Basket is filled with Knitting Balls of Wool (see next section for detail and instruction) and tucked in the back our Ball of Wool and Knitting Needles Button... makes great little Miniature Knitting Needles :-). Next a French Yarn Box, (on Printables) to which I added a Real Thimble, our Embroidery Skein Button and a tiny Pearl Heart from my stash. The Oblong basket I decided to leave the handles off, whichever you prefer. For Sewing Patterns again see below.
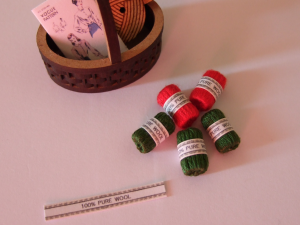
The Balls of Wool are easily constructed from Plastic Drinking Straws!!! 1 Straw was sufficient to make all the Balls for both Cabinets. Cut the Straw into approx 1cm lengths. I used a very Long Needle with Long Eye, which I threaded with 6 Strand Embroidery Thread and "Sewed" around the outside of the Straw keep the thread as taught as possible to avoid catching the needle when passing through the centre. Once the outside is covered to your satisfaction knot off the ends and trim short (pictured below before trimming) and poke the ends down into the straw with an embossing tool or similar. (When you put the "Wool Balls" into the basket put the knotted ends at the bottom or out of sight were possible.) Finally add Little Wool Labels.... on Printable Sheet :-) Wrap around then shorten each end to fit, depending on the thickness of the finished Ball and glue at back.
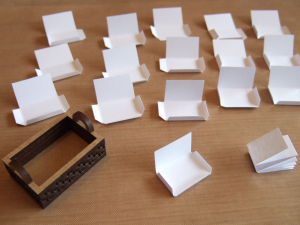
The Oblong Basket is filled with 16 Sewing Patterns, which I have designed to fit, (2 rows of 8). There are two sheets of Sewing Patterns, I used mostly Sheet 2 for the Shabby Chic Cabinet and Sheet 1 for the other. Plenty to choose from... again......take your pick. I cut each out with Scissors, sit in good light as these are pale Patterns on a White Background :-) Score along the Flap Edges with a Fine Embossing Tool. To "pad out" the patterns so they looked realistic I filled each with a strip of paper approx 11mm wide cut width ways across a sheet of copier paper. Score one end so it is long enought to fit into the pattern pack. then fold backwards and forwards until it is concertinaed up. Now place the padding into the pattern, fold down the long flap at top, then pattern back, now fold up bottom flap and glue to back of pattern, repeat with long remaining side. Set aside to dry. And your Done!
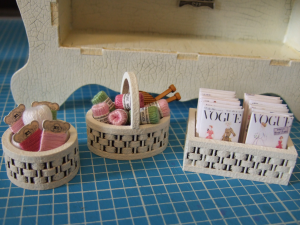
A few additional shots following.... showing Preparation and Individual Pieces. The 3D Miniature Baskets look lovely when filled and work as Individual Pieces in their own right :-)
And finally our Little Cabinet of Curiosities in all its Shabby Chic glory. The Fabric Bundles are from my Fat Qtr Fabric Stash. I cut pieces of fabric approx 15 cm x 18 cm and folded them up into little bundles. I secured them with a Ribbon and added a Bow and Tiny Pearl. The Cameo and Frame is also from my stash to which I have added a Pearl Trim to match the top of 1 of the Bottles. For the finishing touches I have added Lace Trim along the top and above the bottom long shelf, a Paper Rose, Mini Scissors Charm and a Crochet Flower Layered up.
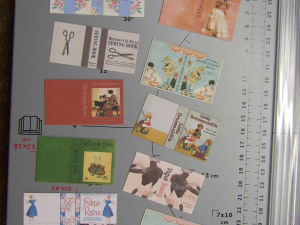
Links for the Free Printable PDF's for both the Sewing Cabinet of Curiosities and the Shabby Chic Cabinet of Curiosities are below.
I printed all these on 160gsm Card. The Book Covers, Skein Cards and Vintage Thread Charts were then additionally stuck onto heavyweight Cream Card.