
Cabinet of Winter Curiosities
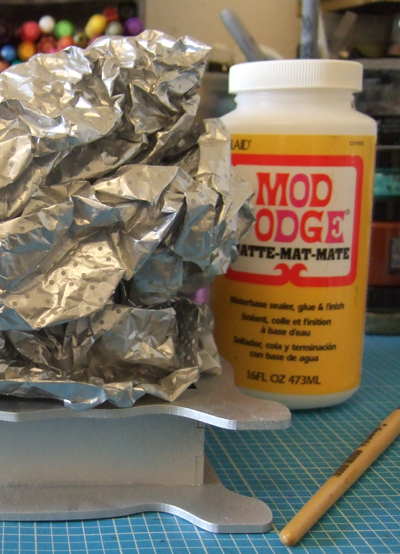
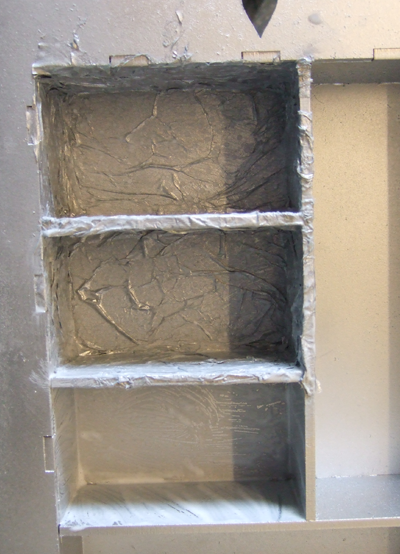
One of two Cabinet of Curiosities we decorated for the 2015 Xmas Season. I decided to go with a lovely Teal & Red theme for the Frosty Cabinet of Winter Curiosities. I assembled the Cabinet first, (Assembly Guide HERE) then sprayed with a Silver Spray Paint to provide a background to Mod Podge some Silver Spotty Tissue on to. I scrunched the paper up lightly before tearing into strips & glueing onto the Cabinet. Make sure not to cover the bottom of the feet so the Cabinet stands firmly when completed.


Once you decorated the Cabinet you can start adding all the lovely details. I've used a pair of Mini Skates which I decorated the same as our Snowflakes. Firstly I coloured the Blades with a Silver Metallic Sharpie. Use a paint brush to paint the Toe of the Boots with White Gesso and I also painted these both sides, but applied Glitter only to the fronts. The little Silver Candy Cane Charm was originally all Silver, I've simply coloured the spiral with my Red Sharpie, to match in with my chosen colour scheme. At the back of the Shelves I've Decopatched little Vintage Images I have in my digi stash, be careful you don't over work the glue on home printables as it can smudge the image if you are not careful.
I've used two of our Buttons on the Second Shelf, our Hat & Mittens Set. Paint the Pompom with two coats of white Gesso. I've used a Blue Sharpie for the rest of the Hat & Mittens then coloured with an Opaque White over the Hat Band to create a Paler Blue. All the little Bottles have been filled with various Glitters, Decorative pins where cut short and pushed into the cork tops and finally DMC Metallic Embroidery Thread was wrapped around the jar tops to add detail. The little Twig Wreath I sponged with White Gesso and added tiny Red Beads and a Heart Pin Head. Add any little treasures you have in your stash to create your little scenes.

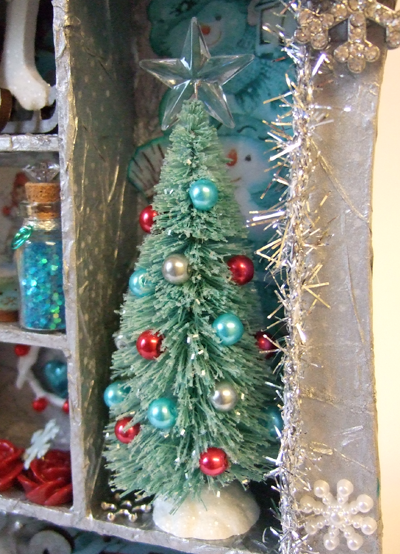
The Tree was originally a Dark Green Bottle Brush Tree with Snow on, but I found a wonderful technique on-line for creating your own Coloured Trees. Basically all you have to do is put them in household bleach! I dunked the tree in a 50% Bleach 5o% Water solution having first removed the Tree from the plastic base. Hold with a clothes peg then you can easily get it out. They turn a very Pale Beige Colour. Once it was done I rinsed it very well in clean water and left it to dry. Meanwhile I sponged two coats of White Gesso on the Plastic Base, sprinkling the final coat with Cosmic Shimmer Glitter Jewels "Diamond Sprinkles" and set aside to dry. Now you can paint or spray your tree any colour you want. For my tree I used Tattered Angles Glimmer Mist Chalkboard "Teal High Heel"". Once dry I gave a very light spray with glue and then sprinkled with Cosmic Shimmer Glitter Jewels "Glacier Ice" Finally I stuck Red, Silver & Blue Pearl Beads on for Baubles with my Crafters Pick Ultimate Glue and topped with a Clear Star.

Along the bottom shelf I placed a Silver Floral Spray and added a Bird from our mixed Bird Pack coloured with a Blue Sharpie and one of our Mini Sledges which fit perfectly in our Cabinets coloured with Red and Blue Sharpie and Metallic Silver for the Runners. The Snowballs are tiny polystyrene balls sold for Fishing!! I stuck pins in them and used Blu Tack to hold the pins while I sponged them with White Gesso before sprinkling with Cosmic Shimmer Glitter Jewels "Diamond Sprinkles", once dry I piled them up on my sled :-)
The front of the Cabinet has been decorated with Miniature Silver Tinsel, Silver and White Snowflakes and a lovely cluster of Bells, Flowers, Bakers Twine and a large Diamante Snowflake.
