
There’s a Moose Loose Aboot the Hoose
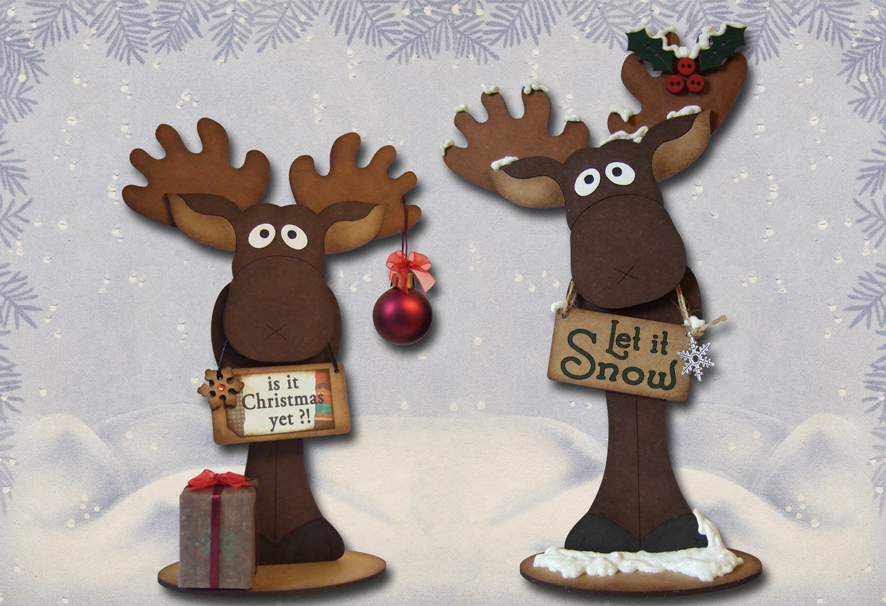
Just like our new Robins these Moose are very easy to decorate and assemble. They include a sign which says "Let it Snow" and look very effective with a snowy effect added..... be careful what you wish for Mr Moose! As an alternative you can turn the "Sign" over and add your own message, for the alternative sample I printed off a tag, stuck it on with double sided tape & added one of our snowflakes from the new Snowflake Pack, also available in the Winter Pack. Both Moose where coloured with Furniture Touch Up Markers, these are readily, and cheaply :-) available on-line. They are large and chunky so provide quick coverage. His eyes were painted with two coats of White Gesso and once dry his pupil was coloured with a Fine Black Felt Pen. Once dry I inked all the edges with Ranger Distress Ink Walnut Stain & a sponge. The inner ear is just the walnut stain added to create shadow straight onto the MDF. The Holly is 2 of our Holly Leaf Buttons, 1 Left Leaf & 1 Right Leaf and 3 of our Mini Round Buttons, all coloured with Sharpie Pens.
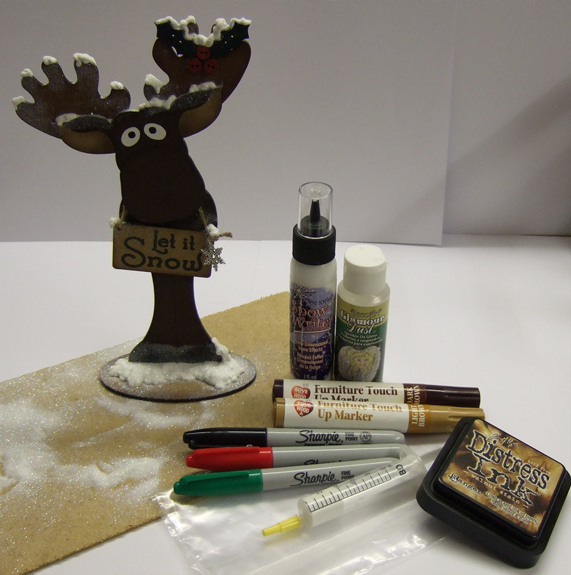
Once all the pieces are coloured and have dried assemble your moose with Wood Glue. Firstly Stick his Antlers onto the back of the Head Piece, it is a good idea to use a cutting mat to lay the pieces on, so you can line everything up easily, also you can add the "Holly & Berries" at this point, allow to dry. Next stick the oval disc, which forms his neck onto the body, in the position you would like his head to be, i.e., high up, low down, at an angle e.t.c., and then stick the head onto the oval disc, again set aside to dry. Once everything has dried thoroughly you can glue him onto the base, position the slot towards the back so most of the weight is over the centre of the base. I coloured the word on the sign with a Blue Sharpie Pen and hung it around his "Neck" with string and added a Silver Snowflake Charm for good measure :-) Now... Let it Snow.... I used Decoart Snow Writer to add the snow, I find it easier to put this into a syringe (with a narrow palette knife) as it is much easier to control, and simply pipe onto the areas Snow would naturally fall, once you are happy with the effect, sprinkle, liberally! with Decoart Glamour Dust "Crystal" or similar and set aside to dry. Excess dust can be gently brushed away with a soft paint brush once everything has dried, I usually leave overnight to be sure, especially if the "Snow" is quite thick.
I can't wait to get the Decs up this year as I have the perfect place for my Moose to stand :-)